.NET Report Engine Data Source Connectors Reference
For SQL data sources, such as Microsoft SQL Server, Oracle, etc., .NET Report Engine requires an ADO.NET connector be installed so the Engine can connect to the data source. The ADO.NET connectors are provided by the SQL data source vendor.
This article details where to download, and how to install, the connectors for each supported SQL data source.
Microsoft SQL Server#
Microsoft SQL Server includes its ADO.NET connector as part of the .NET Framework, so no additional software must be installed.
Oracle Database#
To install the ODAC (ODP.NET) Oracle connector (aka Oracle Managed Client), and only the drivers needed, do the following:
- Go to the ‘Oracle Data Access Components’ page: http://www.oracle.com/technetwork/database/windows/downloads/utilsoft-087491.html
- Click the ‘Accept License Agreement’ radio button.
- Find the ‘ODP.NET, Managed Driver Xcopy version only’ section.
- Click the ‘ODP.NET_Managed_ODAC…zip’ link (http://download.oracle.com/otn/other/ole-oo4o/ODP.NET_Managed_ODAC12cR4.zip)
- Oracle will request you sign in before download (if you don’t have an account, you must create one).
- After signing in, the necessary .zip file will be downloaded.
- Close all Office files.
- Once you have downloaded the .zip file, extract all the files to your Downloads folder.
- Open a command prompt as Administrator and navigate (cd) to the extracted Downloads folder (i.e. ODP.NET_Managed_ODAC12cR4).
- Run the command:
install_odpm.bat c:\oracle both true - You should see several “The operation completed successfully” prompts.
- You have installed the necessary drivers to connect to your Oracle data source.
MySQL Server#
Download this ADO.NET connector , then execute the installer.
PostgreSQL#
To download and install the PostgreSQL Npgsql ADO.NET connector:
- Download the latest release of Npsql from github.
- Double-click on the .msi file to begin the installation.
- Accept the EULA.
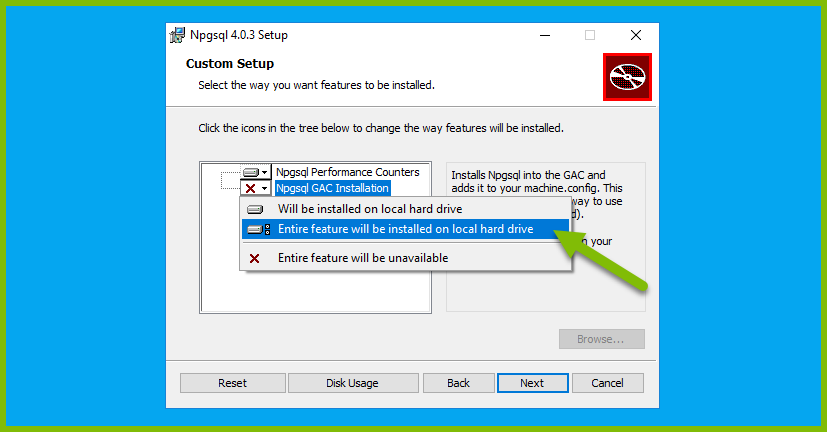
- When the Custom Setup dialog appears, click on "Npgsql GAC Installation" and select "Entire feature will be installed on local hard drive".
- Click on Next
- Click on Install
- Click on Finish
IBM DB2#
To download and install the IBM DB2 ADO.NET connector:
- Go to this IBM Fix Central page.
- In the 'Product selector' input box type "IBM Data Server Client Packages".
- In the 'Installed Version' input box select the latest version.
- In the 'Platform' input box select your PC OS type. Example: "Windows 64-bit, x86".
- Click on Continue.
- On the 'Identify fixes' page, choose the radio button next to 'Individual fix IDs' and in the input box type "dsdriverFP002".
- Click on Continue.
- On the 'Select fixes' page, check the fix pack: "DSClients-ntx{bitness}-dsdriver-{version#}-FP002". Where {bitness} is 32 or 64 and {version#} is the latest version you chose. You don’t want the Merge Modules so be sure the fix pack doesn’t have "mm" before the version #.
- Click on Continue.
- You may have to create an IBMid. Just fill out the form and you’ll receive an email with a code that allows you to complete your new user registration.
- On the 'Download options' page, choose "Download using your browser (HTTPS)" option.
- Click on Continue.
- On the 'Download files using HTTPS' page, download the "{version#}fp2_ntx{bitness}_dsdriver_EN.exe". Where {bitness} is 32 or 64 and {version#} is the latest version you chose.
- After the download completes, run the "{version#}fp2_ntx{bitness}_dsdriver_EN.exe" program and select the defaults.
- After you have followed the prompts from the IBM installer, you have completed the driver install.